 StitchRadar
How to use StitchRadar
StitchRadar nasıl kullanılır?
Three tools in one window: find a design in your archive, find the font, estimate the stitch count. Click any screenshot to enlarge it.
Tek pencerede üç araç: arşivinde deseni bul, fontu bul, vuruş sayısını tahmin et. Büyütmek için ekran görüntülerine tıkla.
Getting started
Başlarken
- Download and install from the home page. If Windows shows a blue warning: More info → Run anyway.
- On first launch, paste your licence code and click Activate. The code works on one computer.
- The setup wizard asks for your design folder. Click Find automatically — it finds the folder that holds your embroidery files. You can add more than one folder.
- Optionally choose your font folder (for Font Finder), then click Start.
- Your archive is scanned in the background. You can already use the program; results get better as more files are indexed. 100,000 files take a few hours.
To change folders later: Settings → Folders…. To switch language: Settings → Language (then restart).
- Ana sayfadan indir ve kur. Windows mavi uyarı gösterirse: Ek bilgi → Yine de çalıştır.
- İlk açılışta lisans kodunu yapıştır, Etkinleştir'e bas. Kod tek bilgisayarda çalışır.
- Kurulum sihirbazı desen klasörünü sorar. Otomatik bul'a bas; nakış dosyalarının olduğu klasörü kendisi bulur. Birden fazla klasör ekleyebilirsin.
- İstersen font klasörünü de seç (Font Bul için), sonra Başla.
- Arşiv arka planda taranır. Bu sırada programı kullanabilirsin; dosya eklendikçe sonuçlar iyileşir. 100.000 dosya birkaç saat sürer.
Klasörleri sonra değiştirmek için: Ayarlar → Klasörler…. Dil için: Ayarlar → Dil (sonra programı yeniden aç).
Design Finder
Tasarım Bul
Search
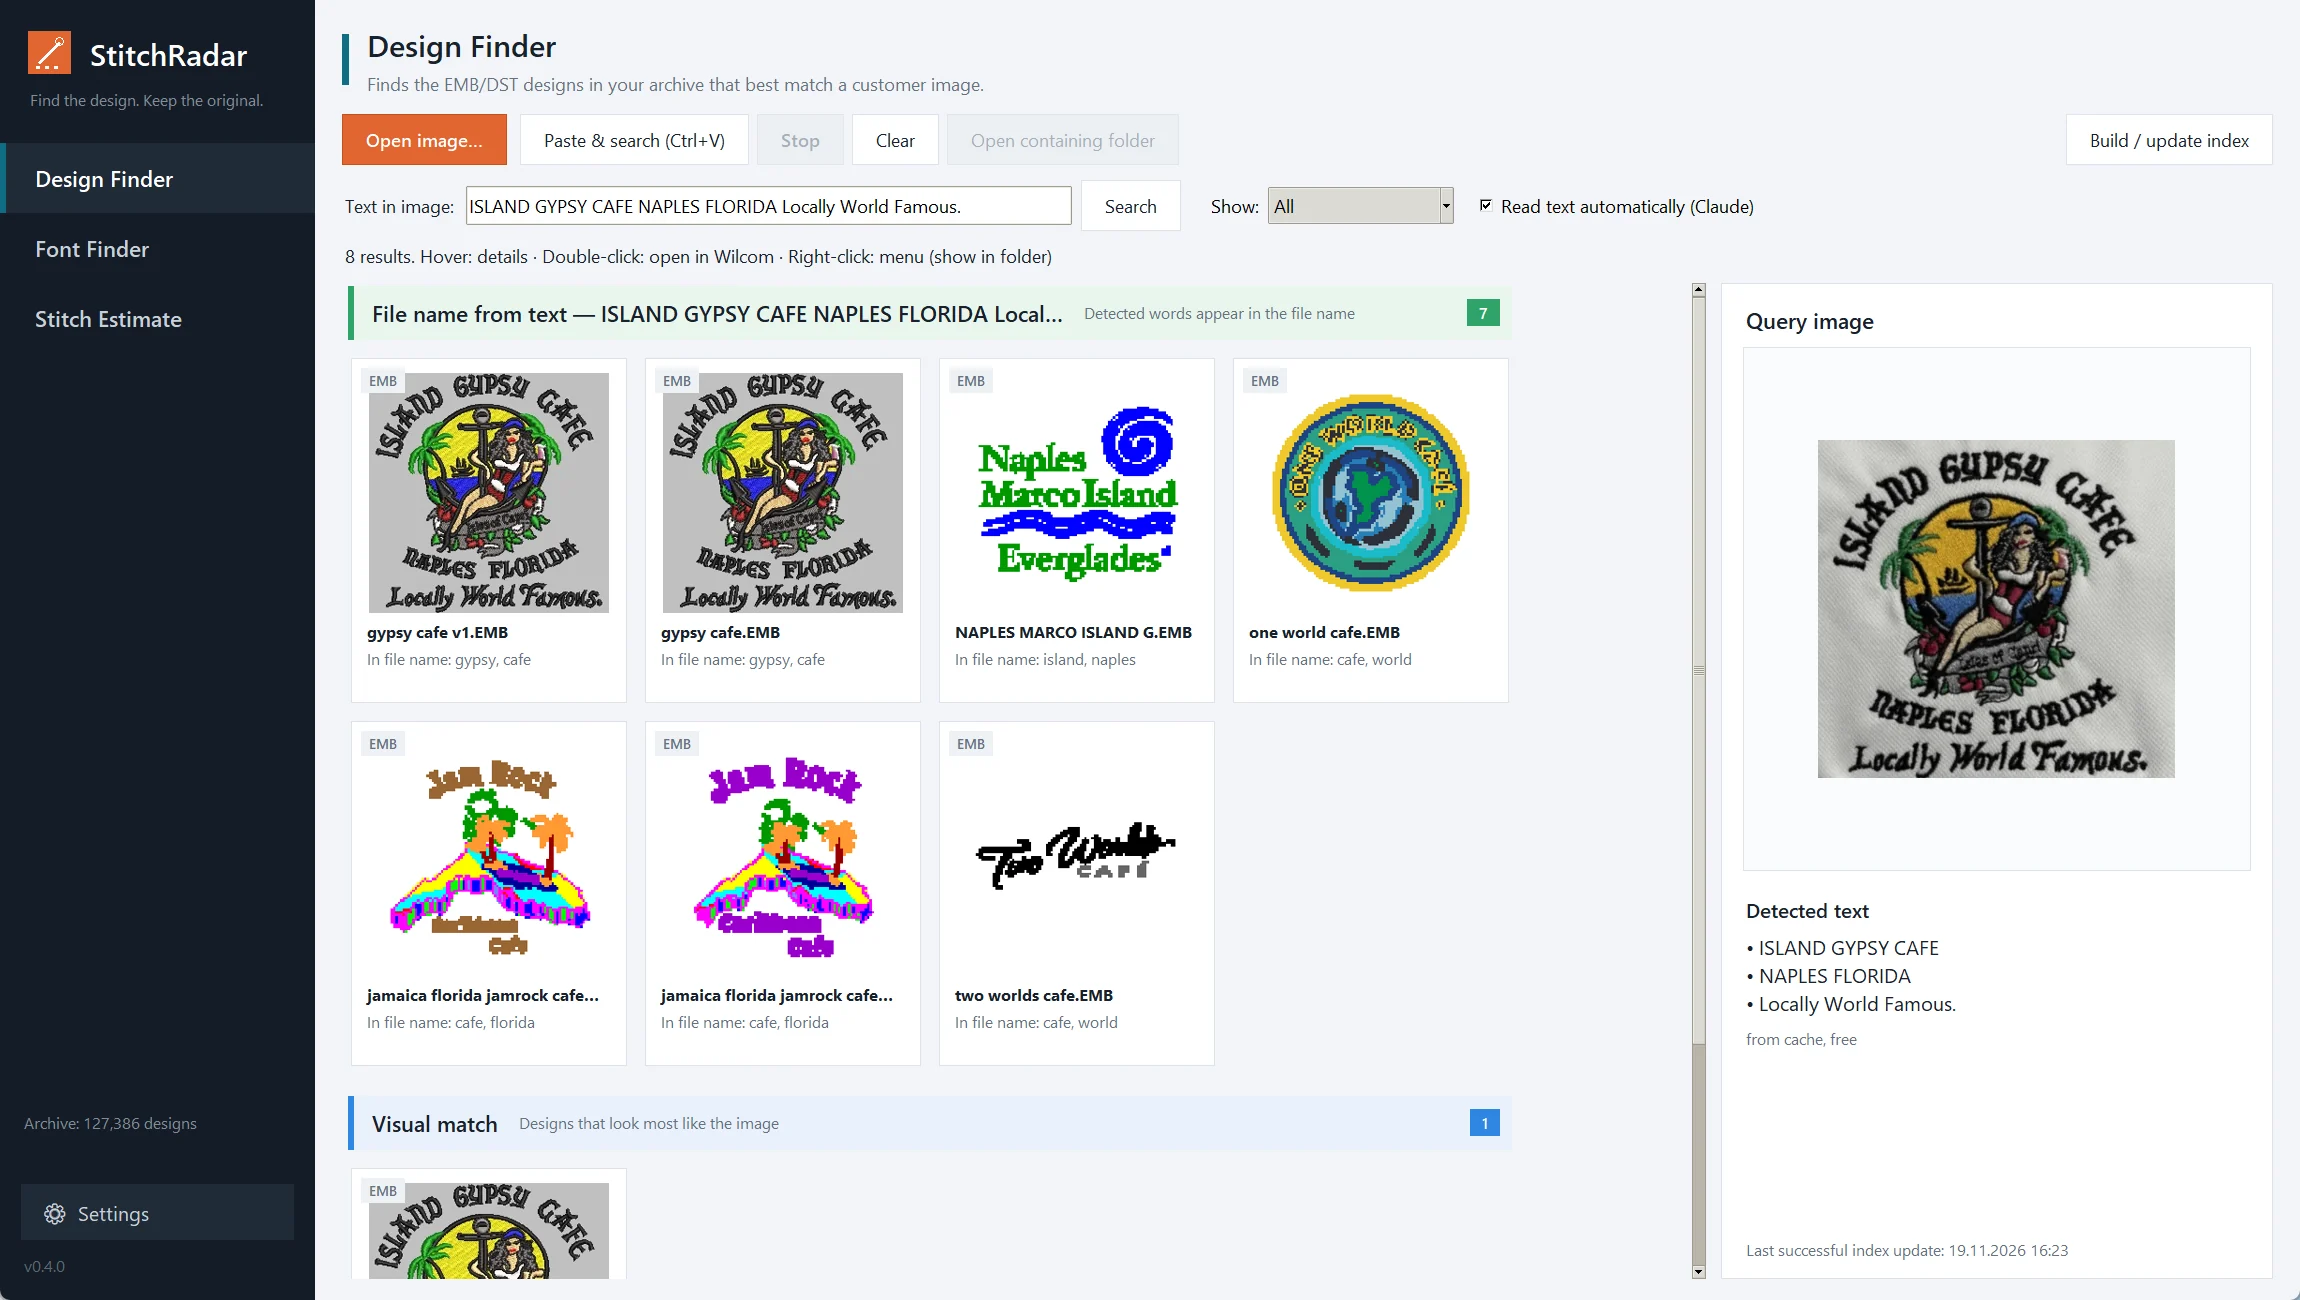
- Give it a picture in any of these ways: drag the file onto the window, press Ctrl+V after copying a picture or a screenshot, or click Open image…. PNG, JPG, HEIC, PDF, AI and EPS work.
- The lettering is read automatically and shown in Text in image. You can correct it and click Search.
- Results come in two groups: File name from text (the words appear in the file name) and Visual match (looks the most like the picture, % = similarity).
Working with results
- Hover a result to see stitches, size and colours.
- Double-click to open the file in your embroidery software (Wilcom, Pulse…).
- Right-click → show in folder.
- Show: filter between program files (EMB, PXF…) and machine files (DST, EXP…).
- Weak matches are folded away under ▸ Show N weaker matches.
Arama
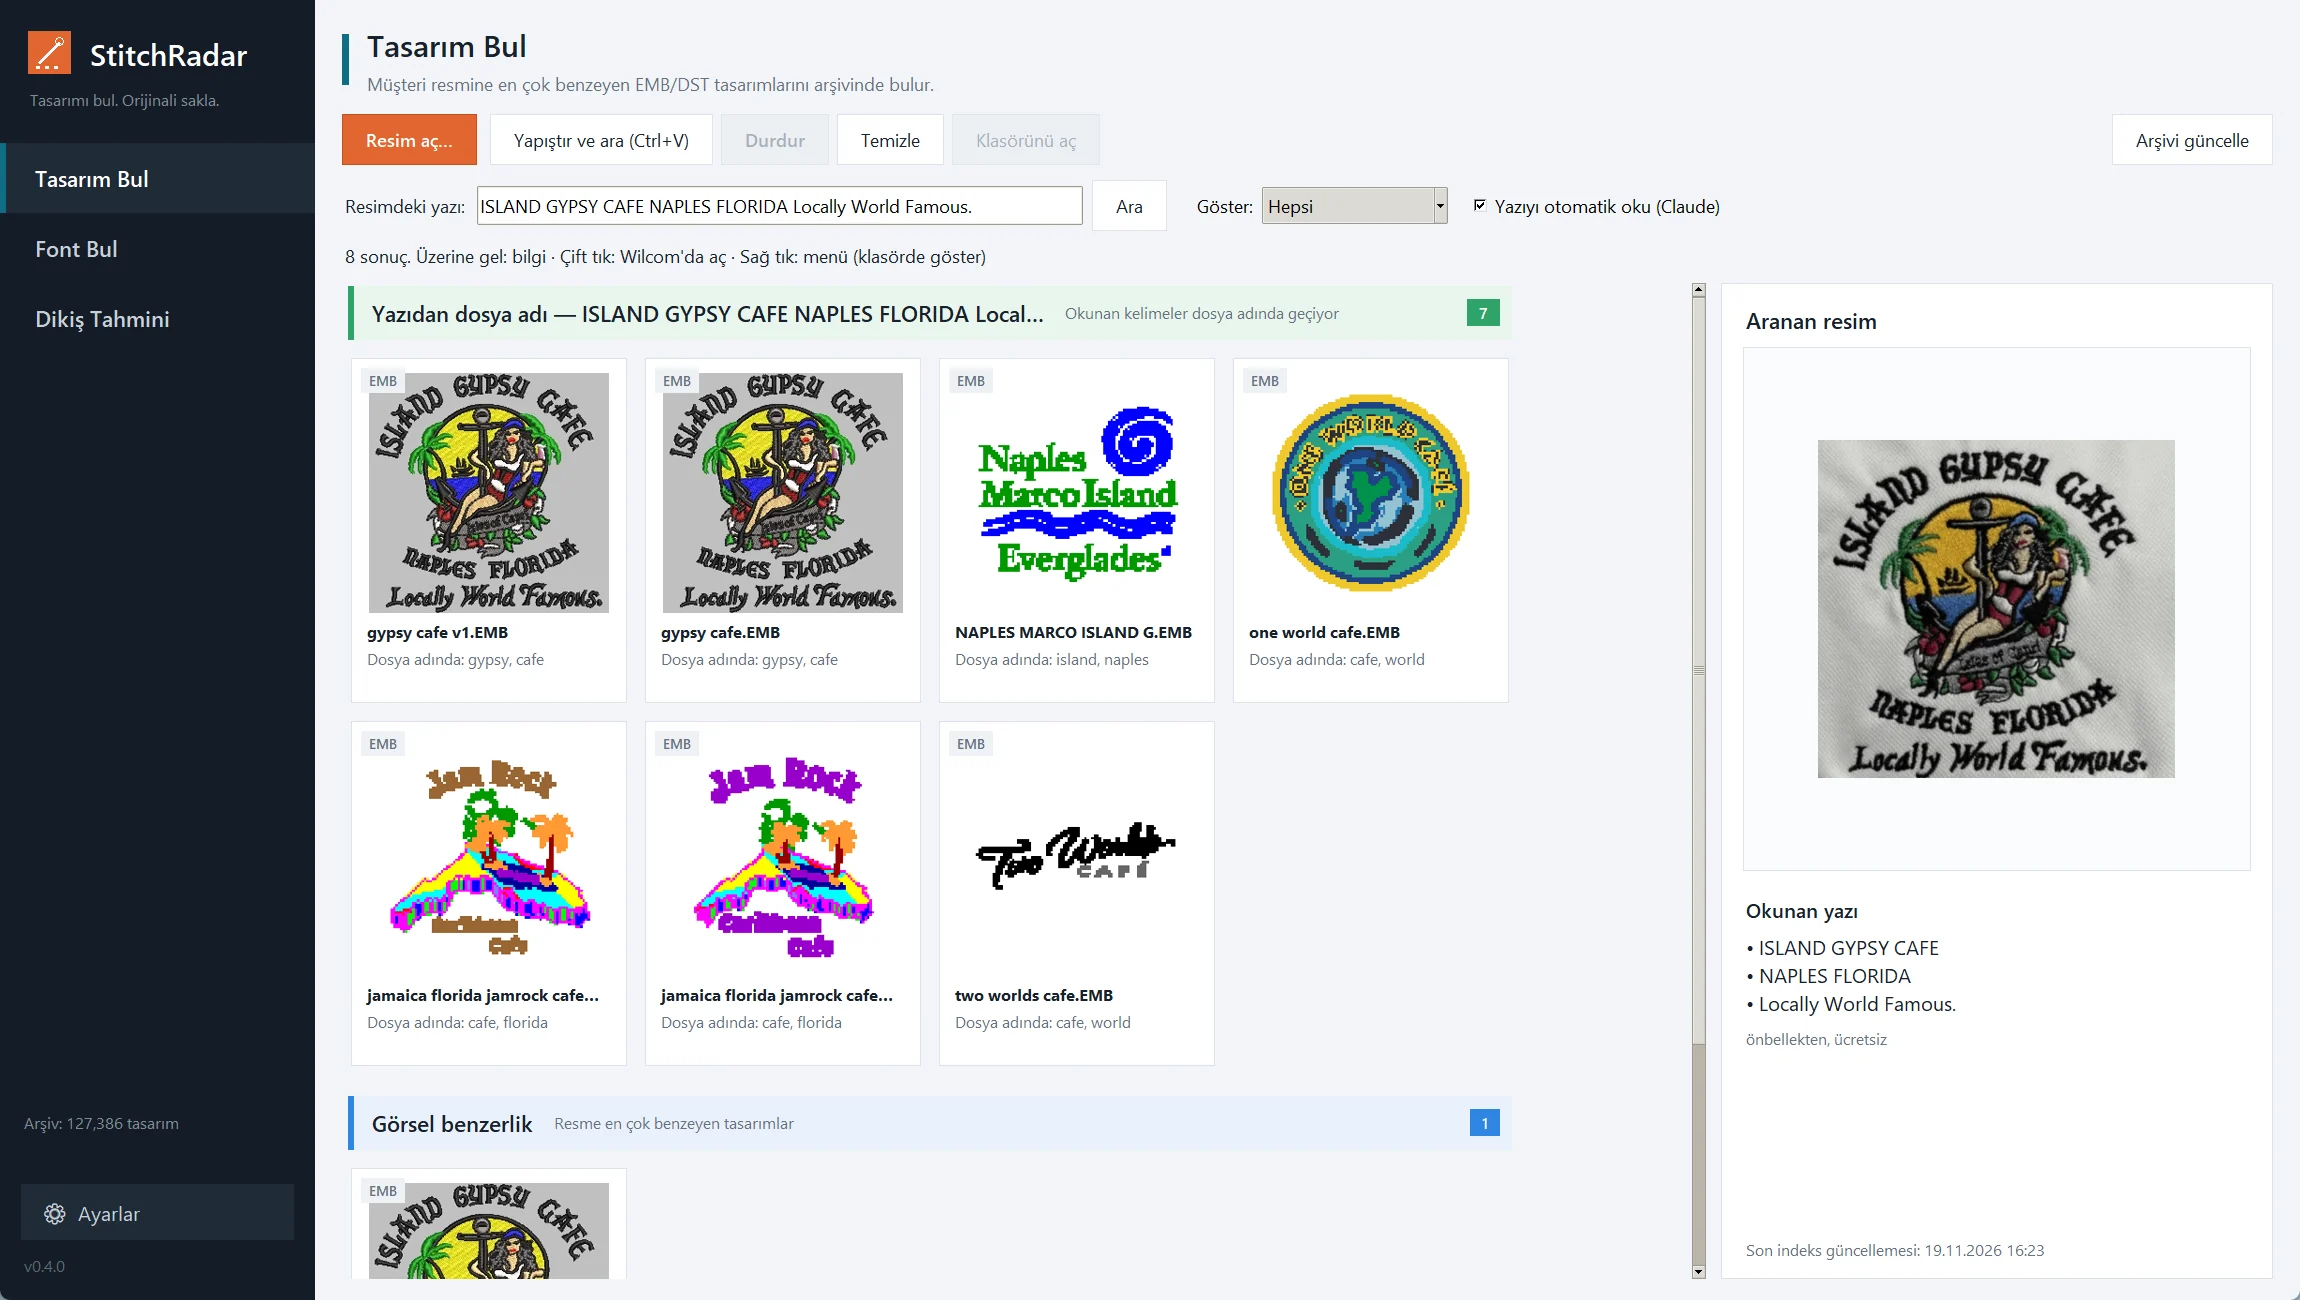
- Resmi şu yollardan biriyle ver: dosyayı pencereye sürükle, resim ya da ekran görüntüsünü kopyalayıp Ctrl+V'ye bas ya da Resim aç…. PNG, JPG, HEIC, PDF, AI ve EPS olur.
- Resimdeki yazı otomatik okunur, Resimdeki yazı kutusunda görünür. Düzeltip Ara'ya basabilirsin.
- Sonuçlar iki grupta gelir: Yazıdan dosya adı (kelimeler dosya adında geçiyor) ve Görsel benzerlik (resme en çok benzeyenler, % = benzerlik).
Sonuçlarla çalışmak
- Sonucun üstüne gel: vuruş, ölçü ve renk sayısı görünür.
- Çift tıkla: dosya nakış programında açılır (Wilcom, Pulse…).
- Sağ tık → klasörde göster.
- Göster: program dosyaları (EMB, PXF…) / makine dosyaları (DST, EXP…) arasında süzer.
- Zayıf benzerler ▸ N zayıf benzer daha göster altında kapalı durur.
Font Finder
Font Bul
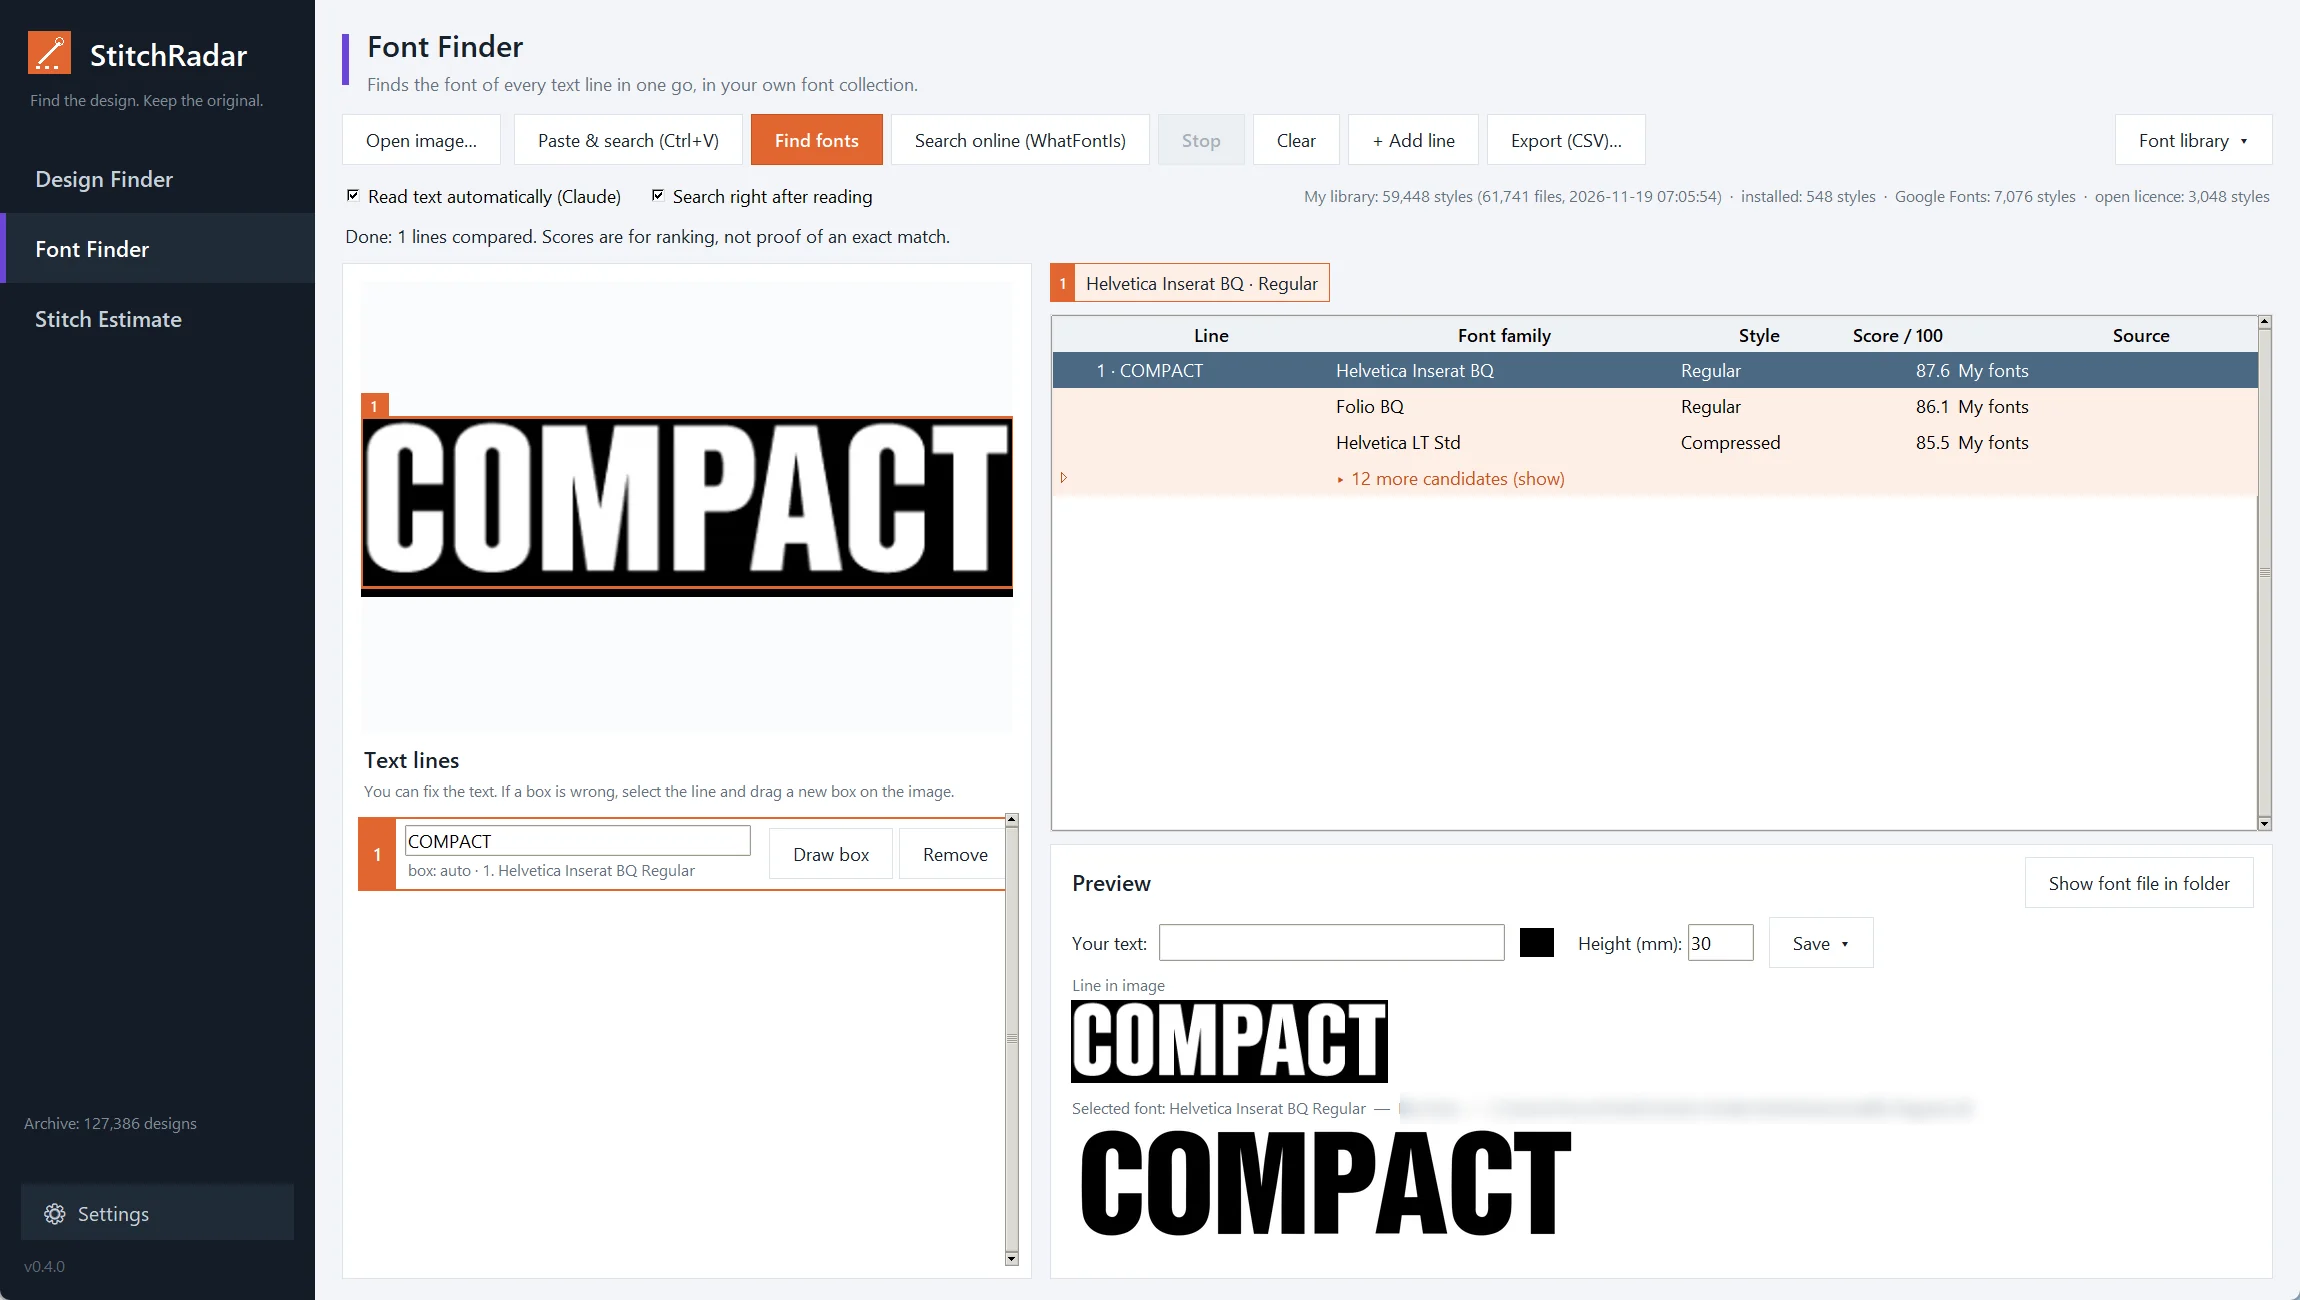
- Give it the picture (drag, Ctrl+V or Open image…). Every text line is found and read automatically; with Search right after reading ticked the search starts at once.
- Check the Text lines list on the left. Wrong text? Type the right one. Wrong box? Select the line, click Draw box and drag a new box on the picture.
- A line was missed? Click + Add line, type its text and draw its box.
- Click Find fonts. The table shows the best 3 candidates per line; more are under ▸ N more candidates.
- Click a candidate to preview it. Type Your text, pick a colour and height in mm, then Save ▾ as SVG, PDF, EPS, PNG or JPG — ready to import into your digitizing software.
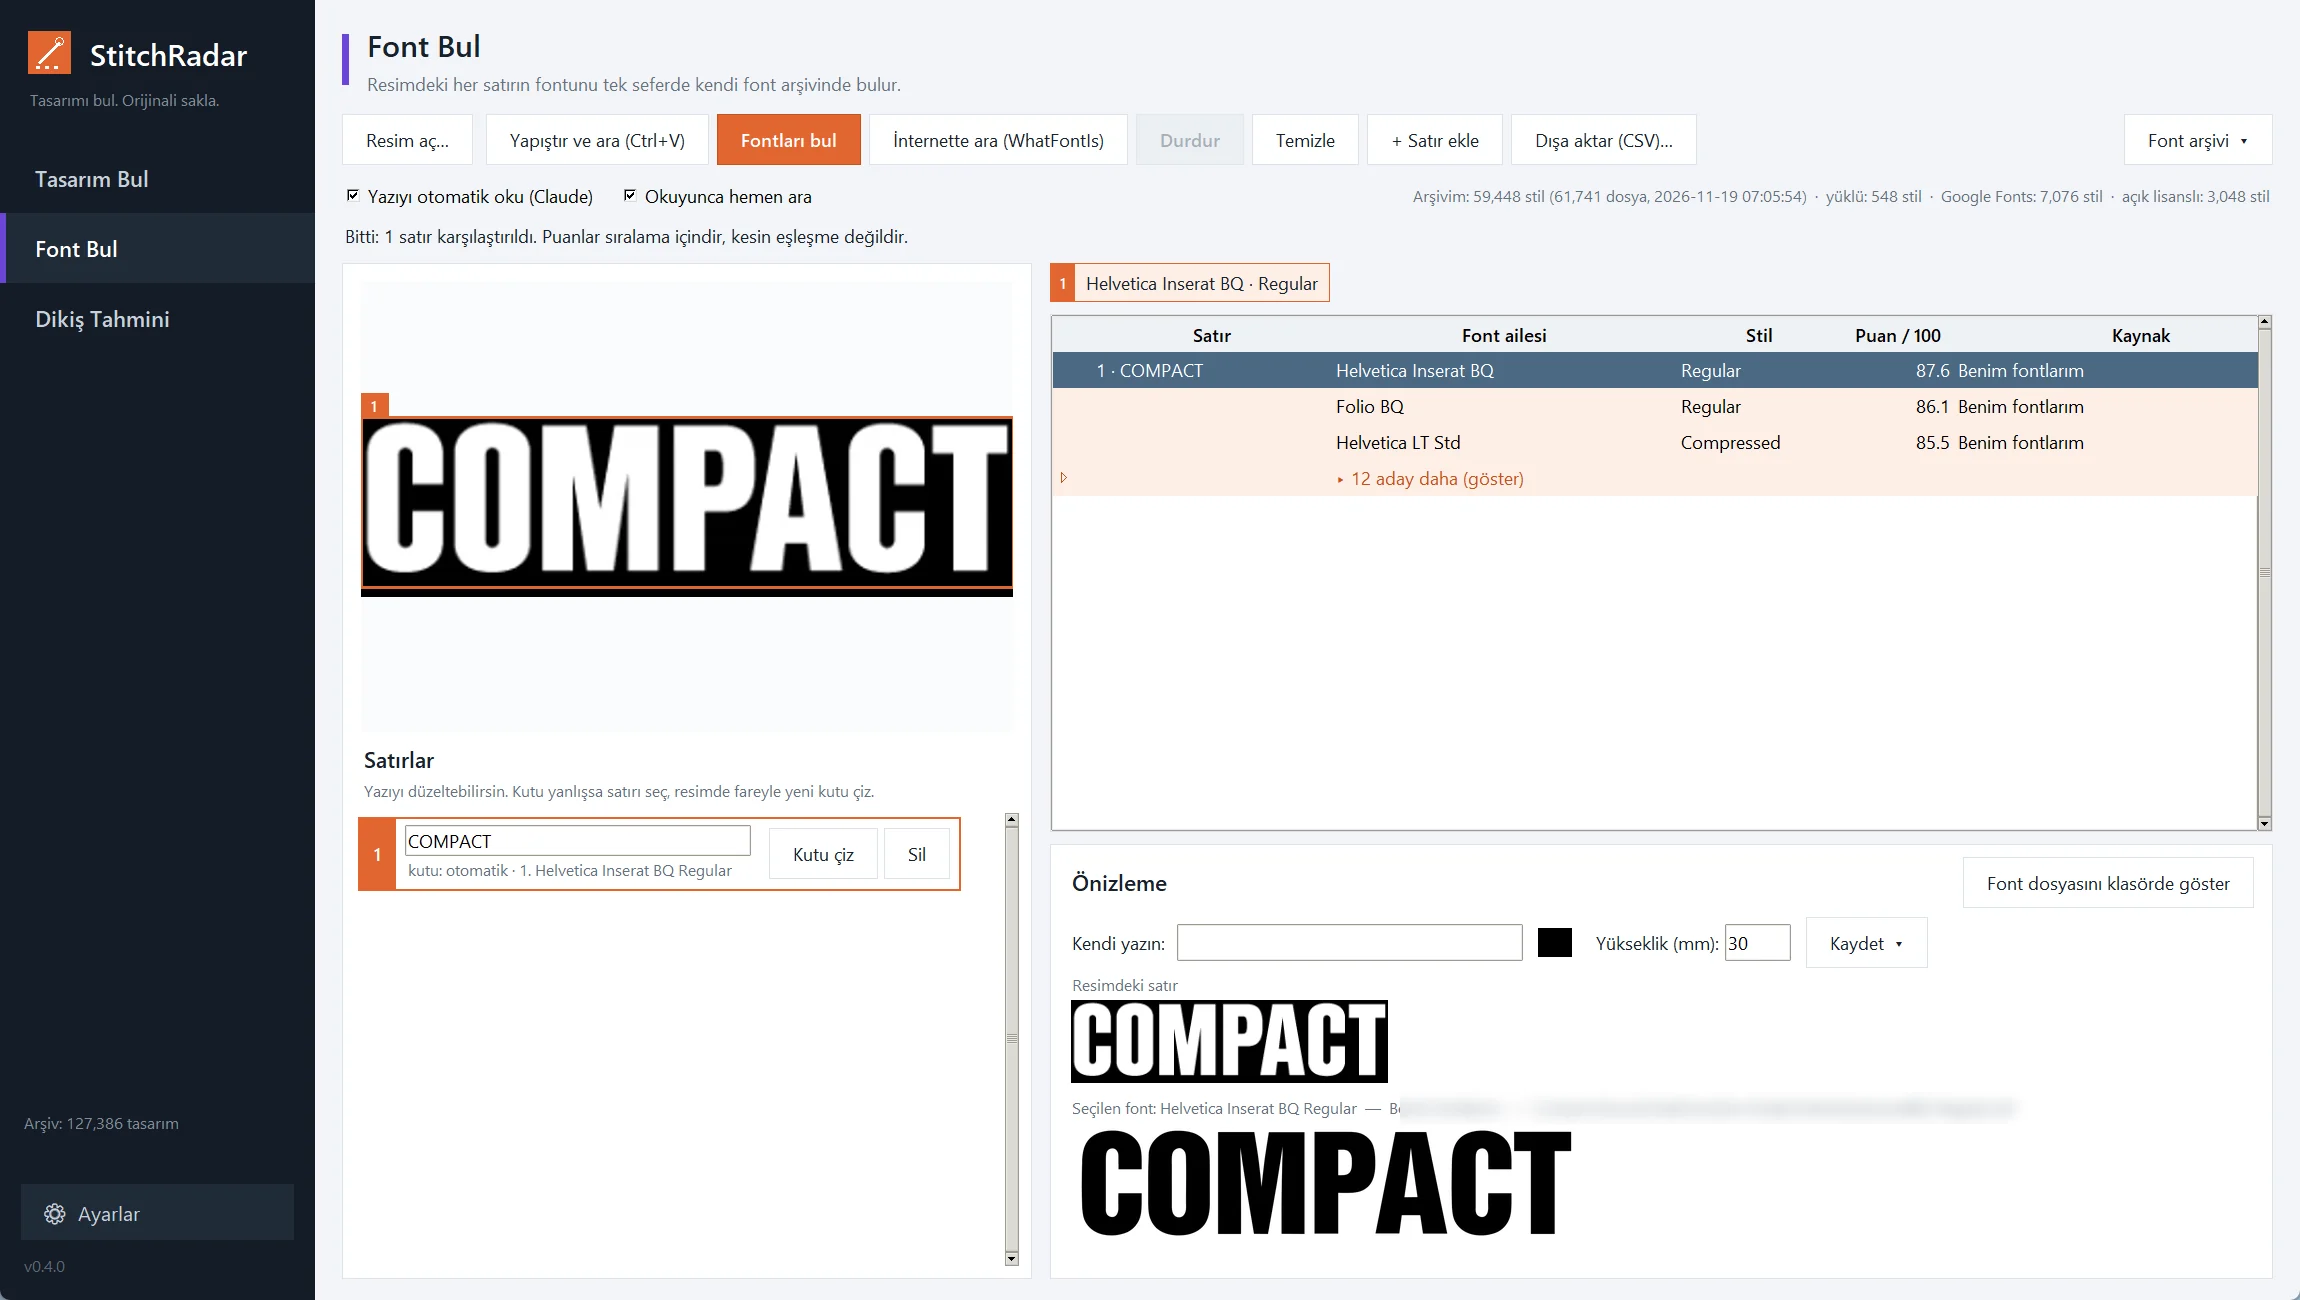
- Resmi ver (sürükle, Ctrl+V ya da Resim aç…). Her yazı satırı otomatik bulunup okunur; Okuyunca hemen ara işaretliyse arama hemen başlar.
- Soldaki Satırlar listesine bak. Yazı yanlışsa doğrusunu yaz. Kutu yanlışsa satırı seç, Kutu çiz'e bas ve resimde yeni kutu sürükle.
- Bir satır kaçmışsa + Satır ekle, yazısını yaz, kutusunu çiz.
- Fontları bul'a bas. Tabloda her satır için en iyi 3 aday görünür; gerisi ▸ N aday daha altında.
- Adaya tıkla, önizlemesini gör. Kendi yazın'ı yaz, renk ve mm yükseklik seç, Kaydet ▾ ile SVG, PDF, EPS, PNG ya da JPG kaydet — nakış programına hazır.
Stitch Estimate
Vuruş Tahmini
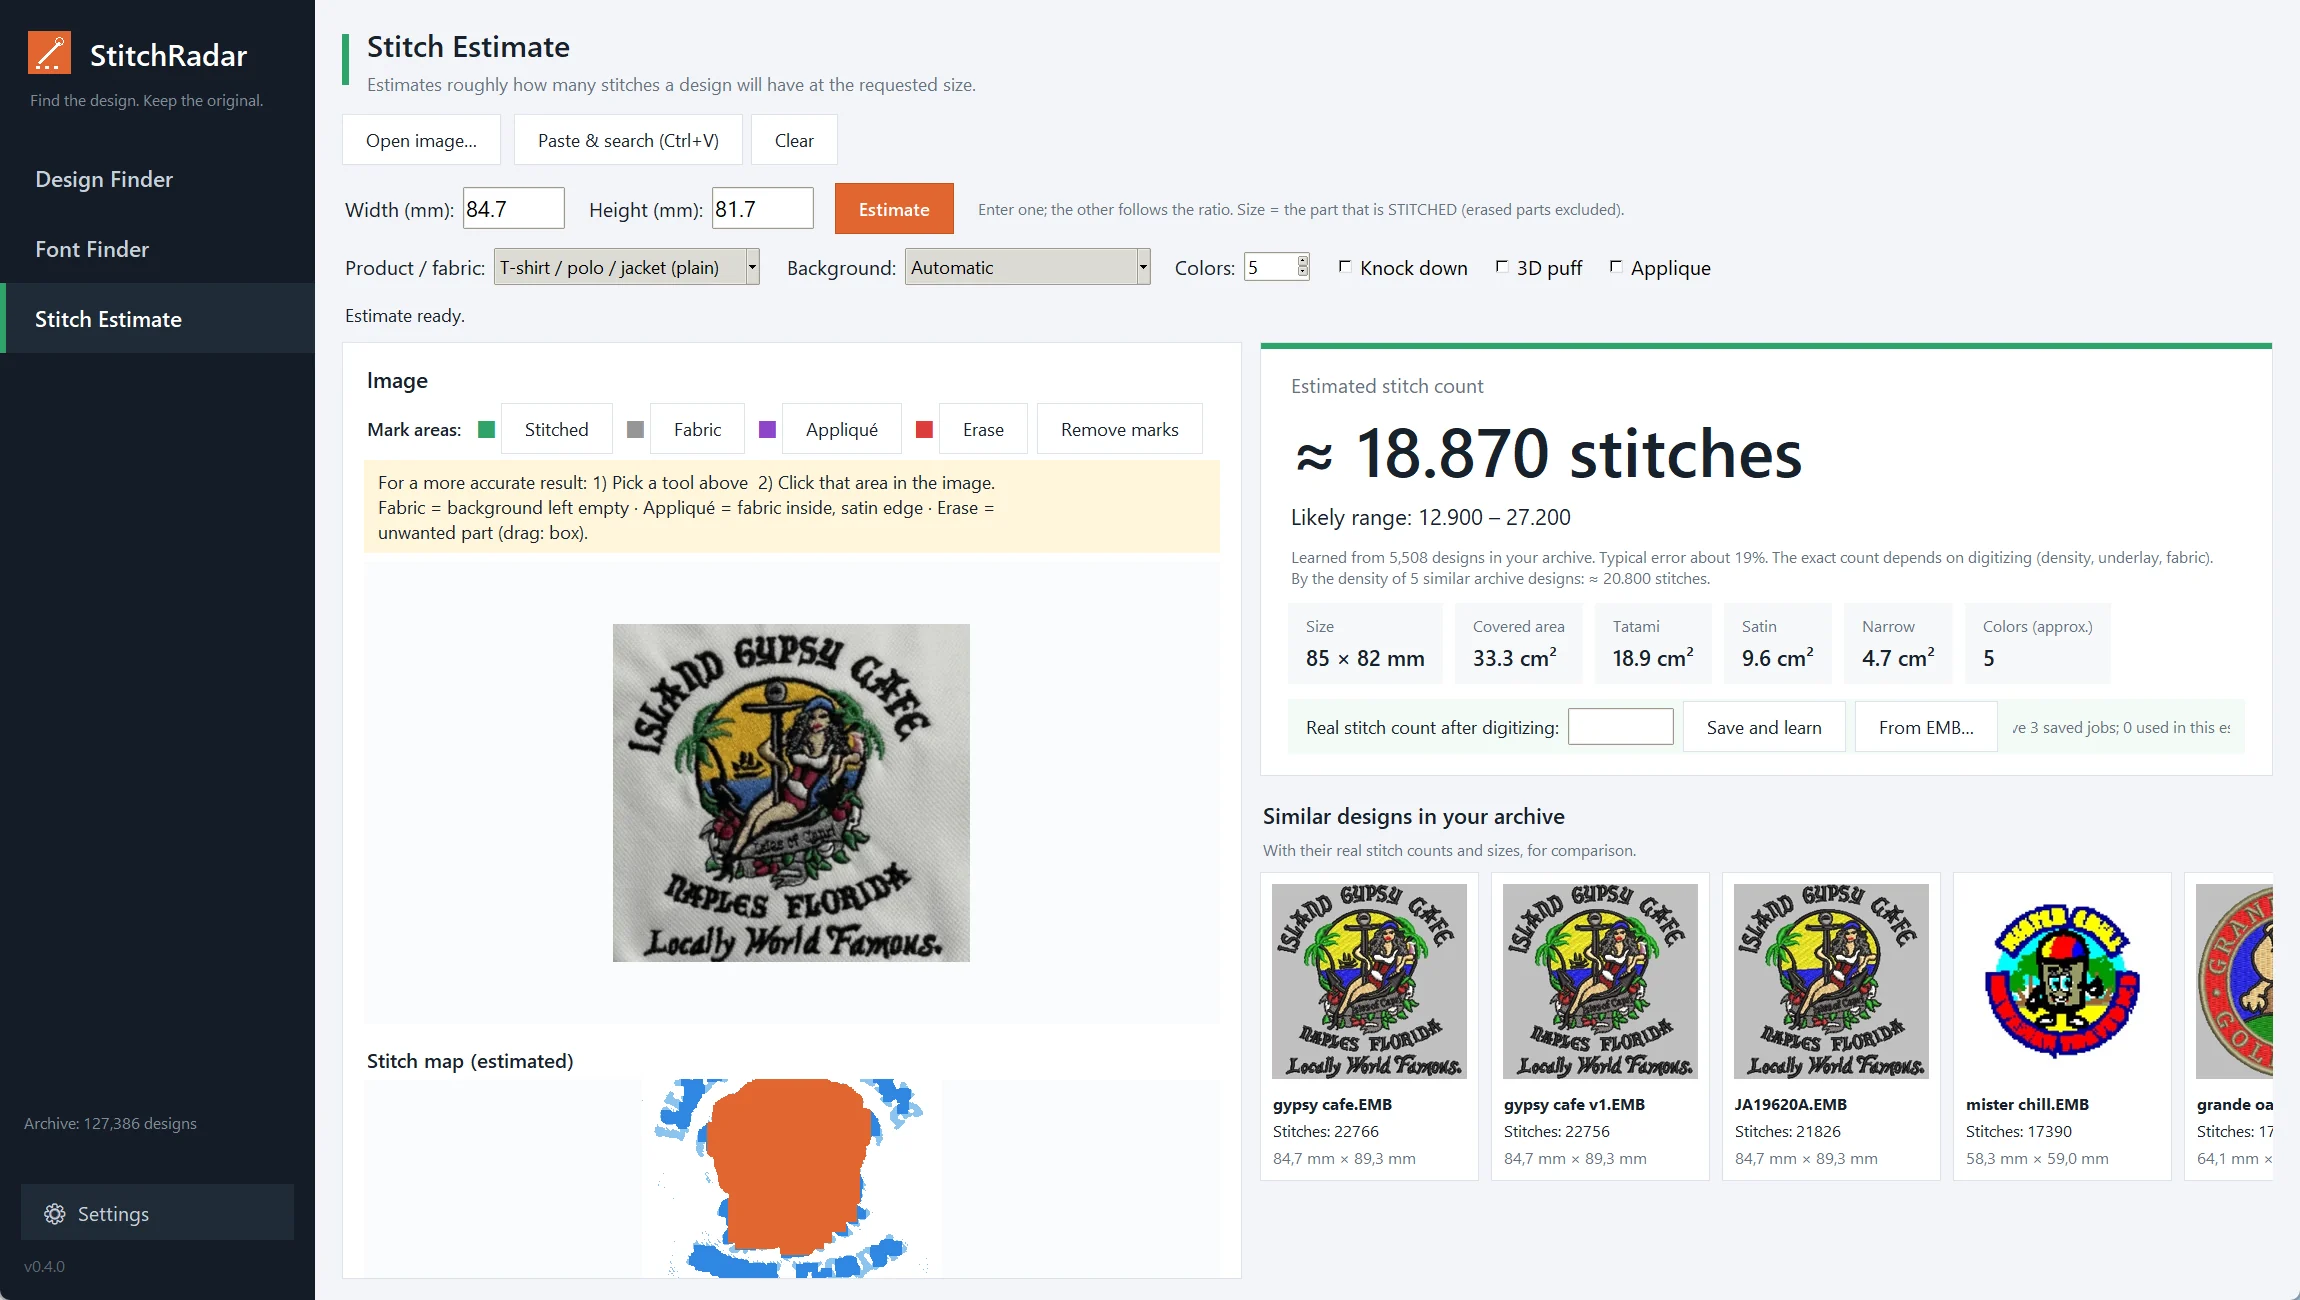
- Give it the customer's picture.
- Type the Width or the Height in mm — the other one follows the picture's ratio.
- Choose Product / fabric (t-shirt, cap, towel, fleece, patch…), and tick Knock down, 3D puff or Appliqué if needed.
- Background: Automatic usually works. Choose Fabric if the background colour is the garment, Stitched if the background is filled with stitches.
- Colors is counted automatically; correct it if it's wrong.
- Click Estimate. Changing a setting greys out the number until you click again.
The stitch map shows how the design will probably be stitched: tatami (wider than 8 mm), satin (2–8 mm), narrow satin / lines (under 2 mm).
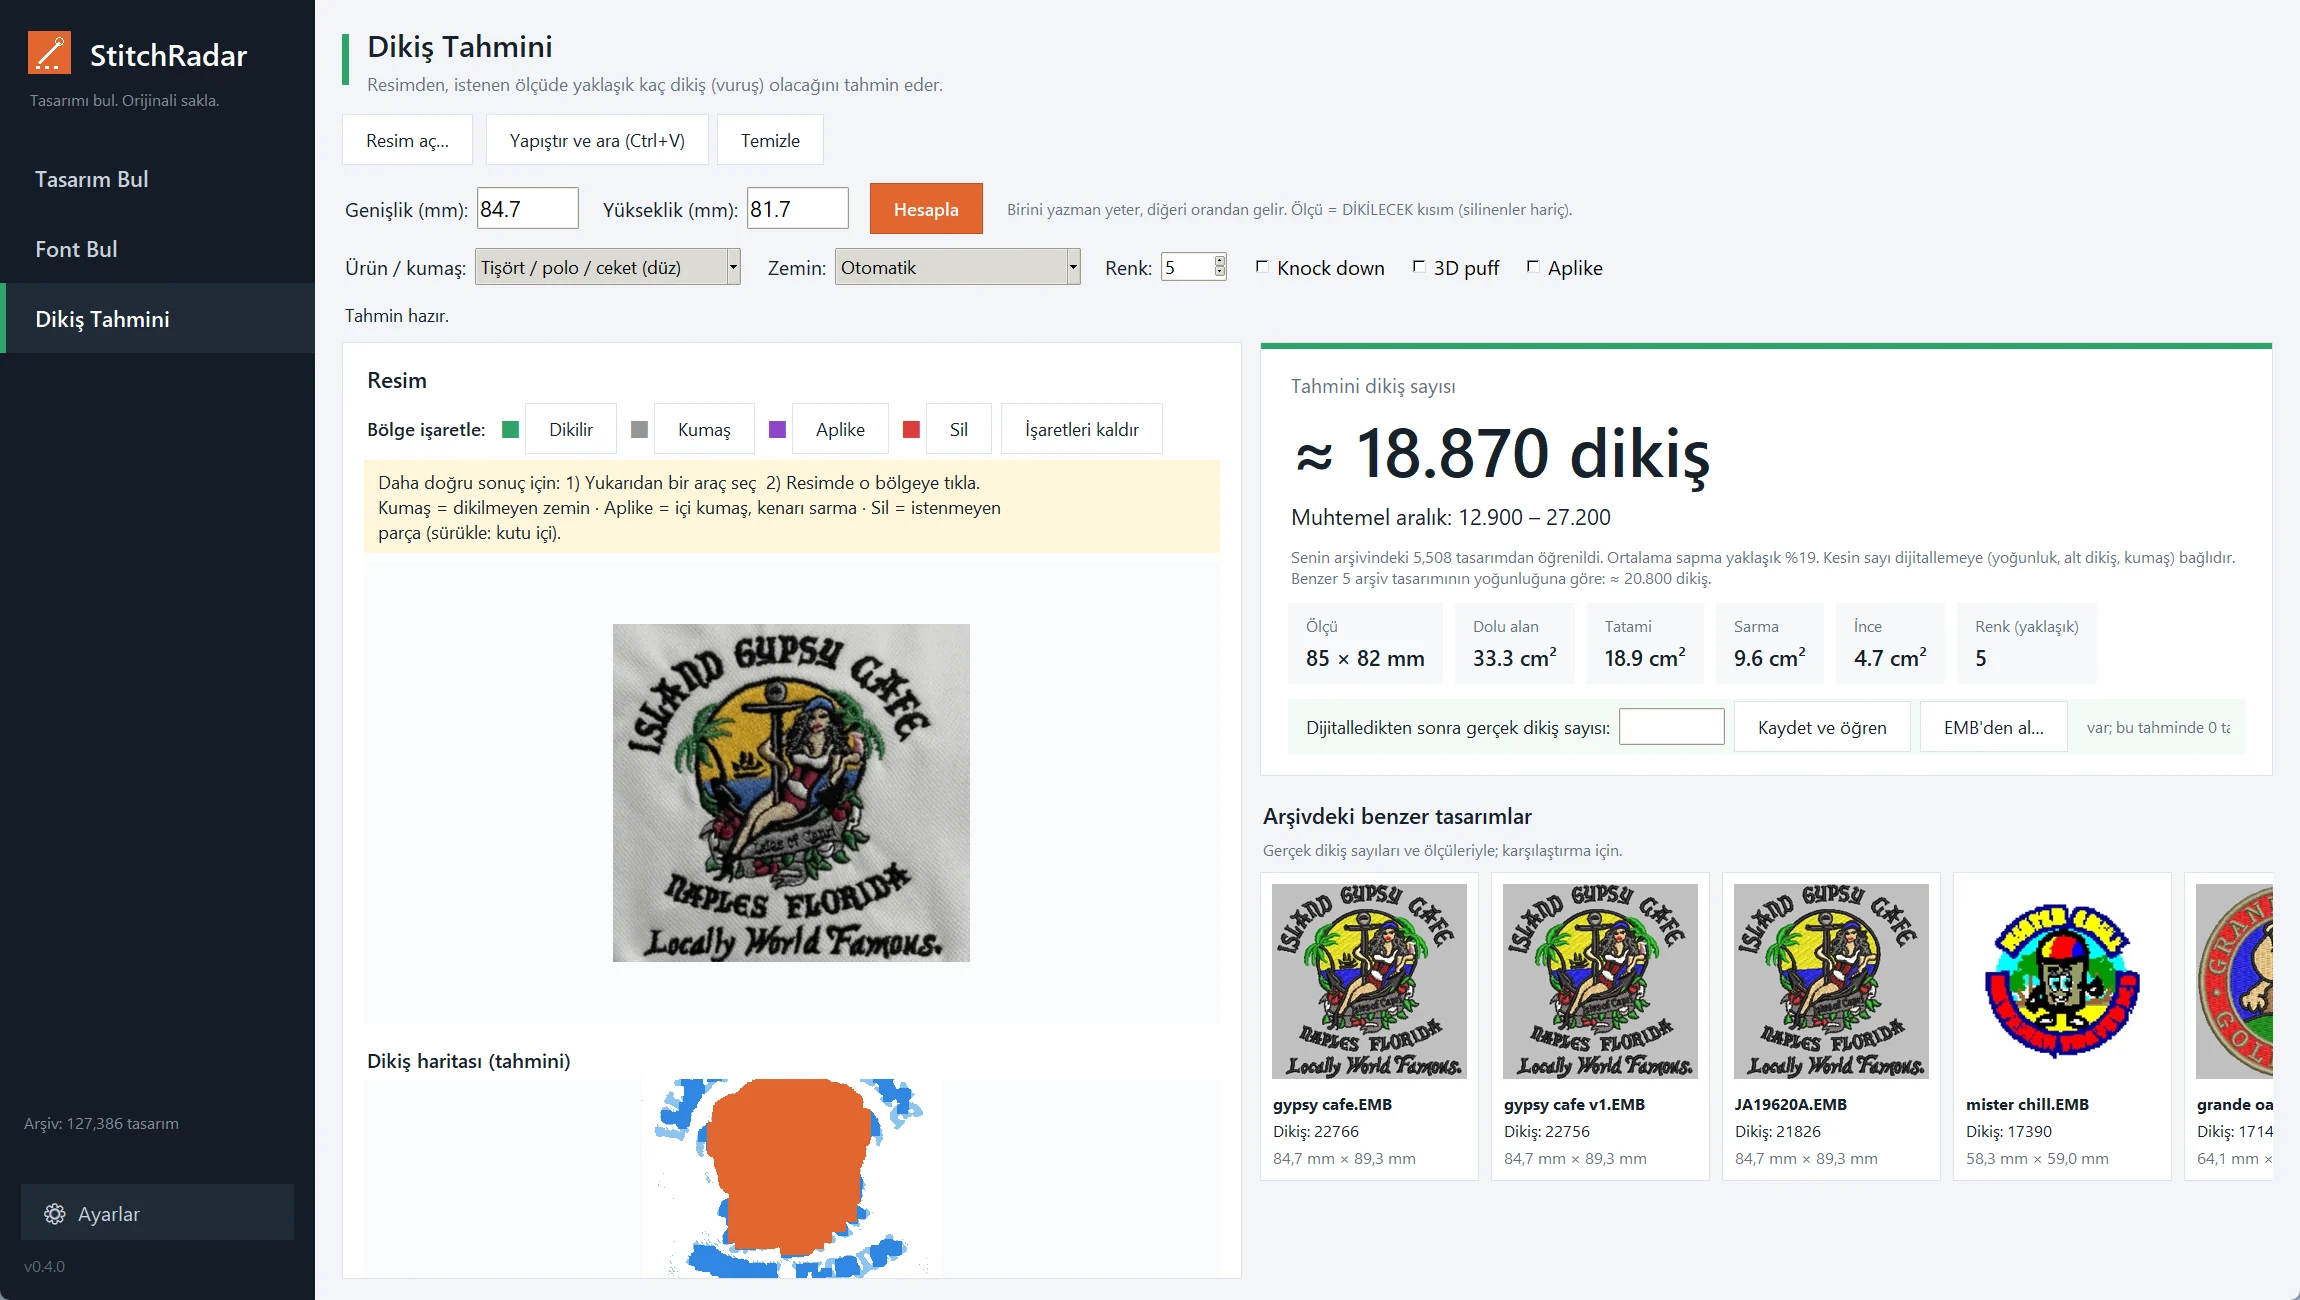
- Müşterinin resmini ver.
- Genişlik ya da Yükseklik'i mm olarak yaz; diğeri resmin oranından gelir.
- Ürün / kumaş seç (tişört, şapka, havlu, polar, yama…); gerekiyorsa Knock down, 3D puff ya da Aplike işaretle.
- Zemin: genelde Otomatik doğru çalışır. Arka plan rengi giysinin kendisiyse Kumaş, arka plan dolguyla dikilecekse Nakış seç.
- Renk otomatik sayılır; yanlışsa düzelt.
- Hesapla'ya bas. Bir ayarı değiştirince sayı griye döner; tekrar bas.
Dikiş haritası desenin büyük ihtimalle nasıl dikileceğini gösterir: tatami (8 mm'den geniş), sarma (2–8 mm), ince sarma / çizgi (2 mm altı).
Marking areas
Bölge işaretleme
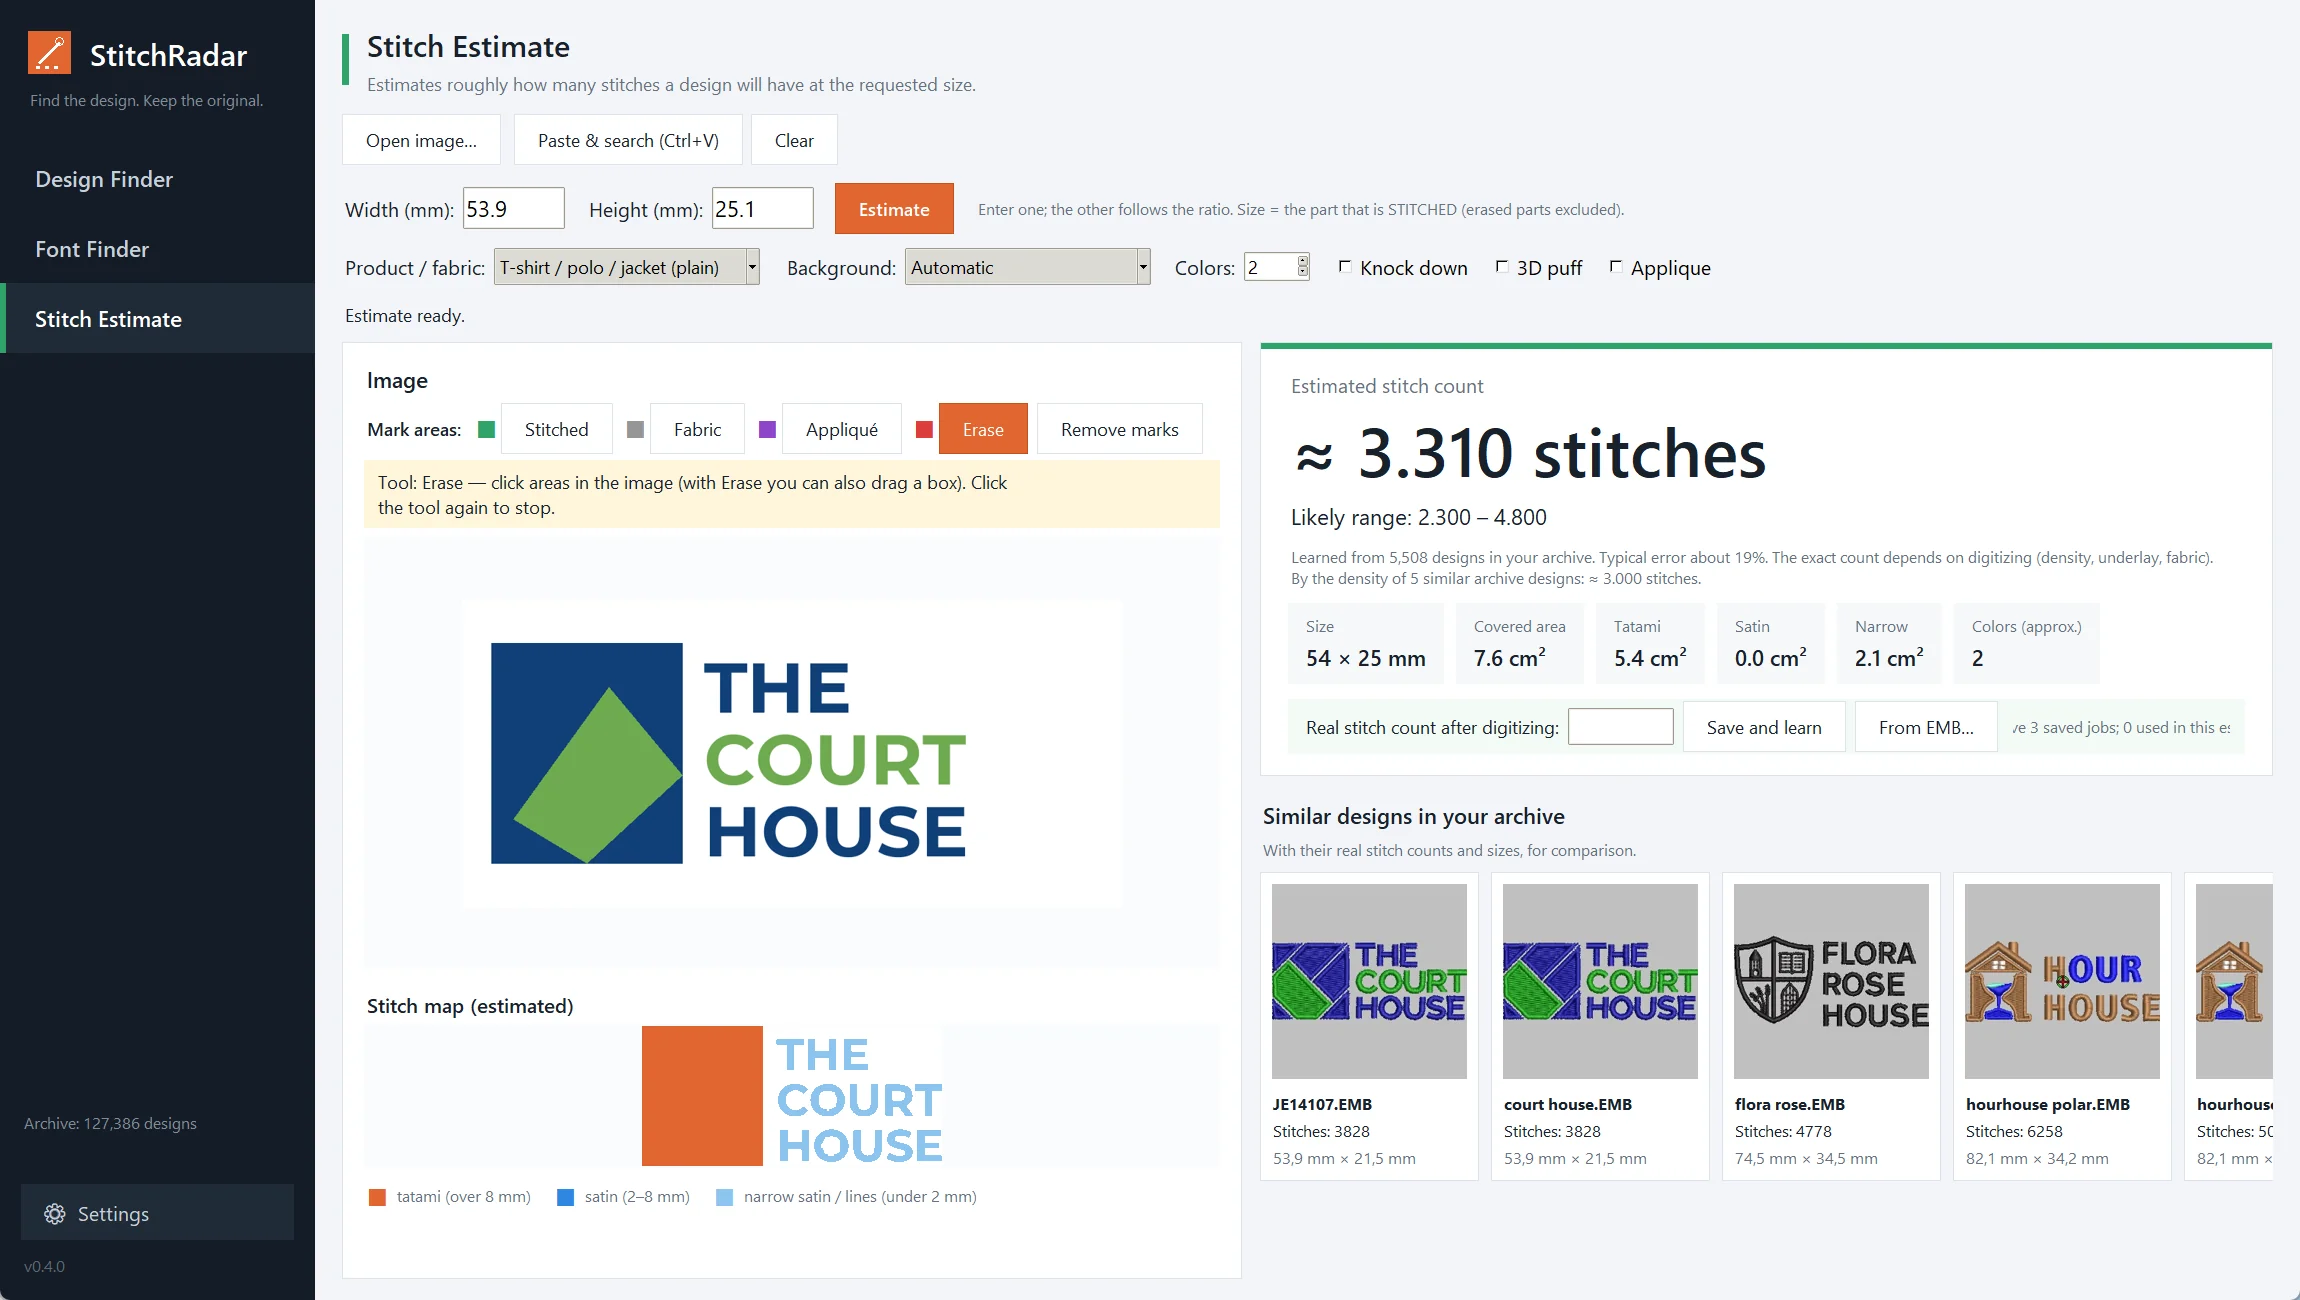
For a more accurate result, tell StitchRadar what each part of the picture is. Pick a tool, then click the area in the picture:
- Stitched — this area will be embroidered (e.g. a background colour that is actually filled).
- Fabric — empty, not stitched (e.g. ribbons that show the garment).
- Appliqué — fabric inside, satin edge around it (the edge and its zigzag underlay are counted).
- Erase — leave it out completely, e.g. a word the customer doesn't want or boxes beside the logo. Click a part, or drag a rectangle.
- Remove marks clears everything. Right-click on the picture always opens the menu.
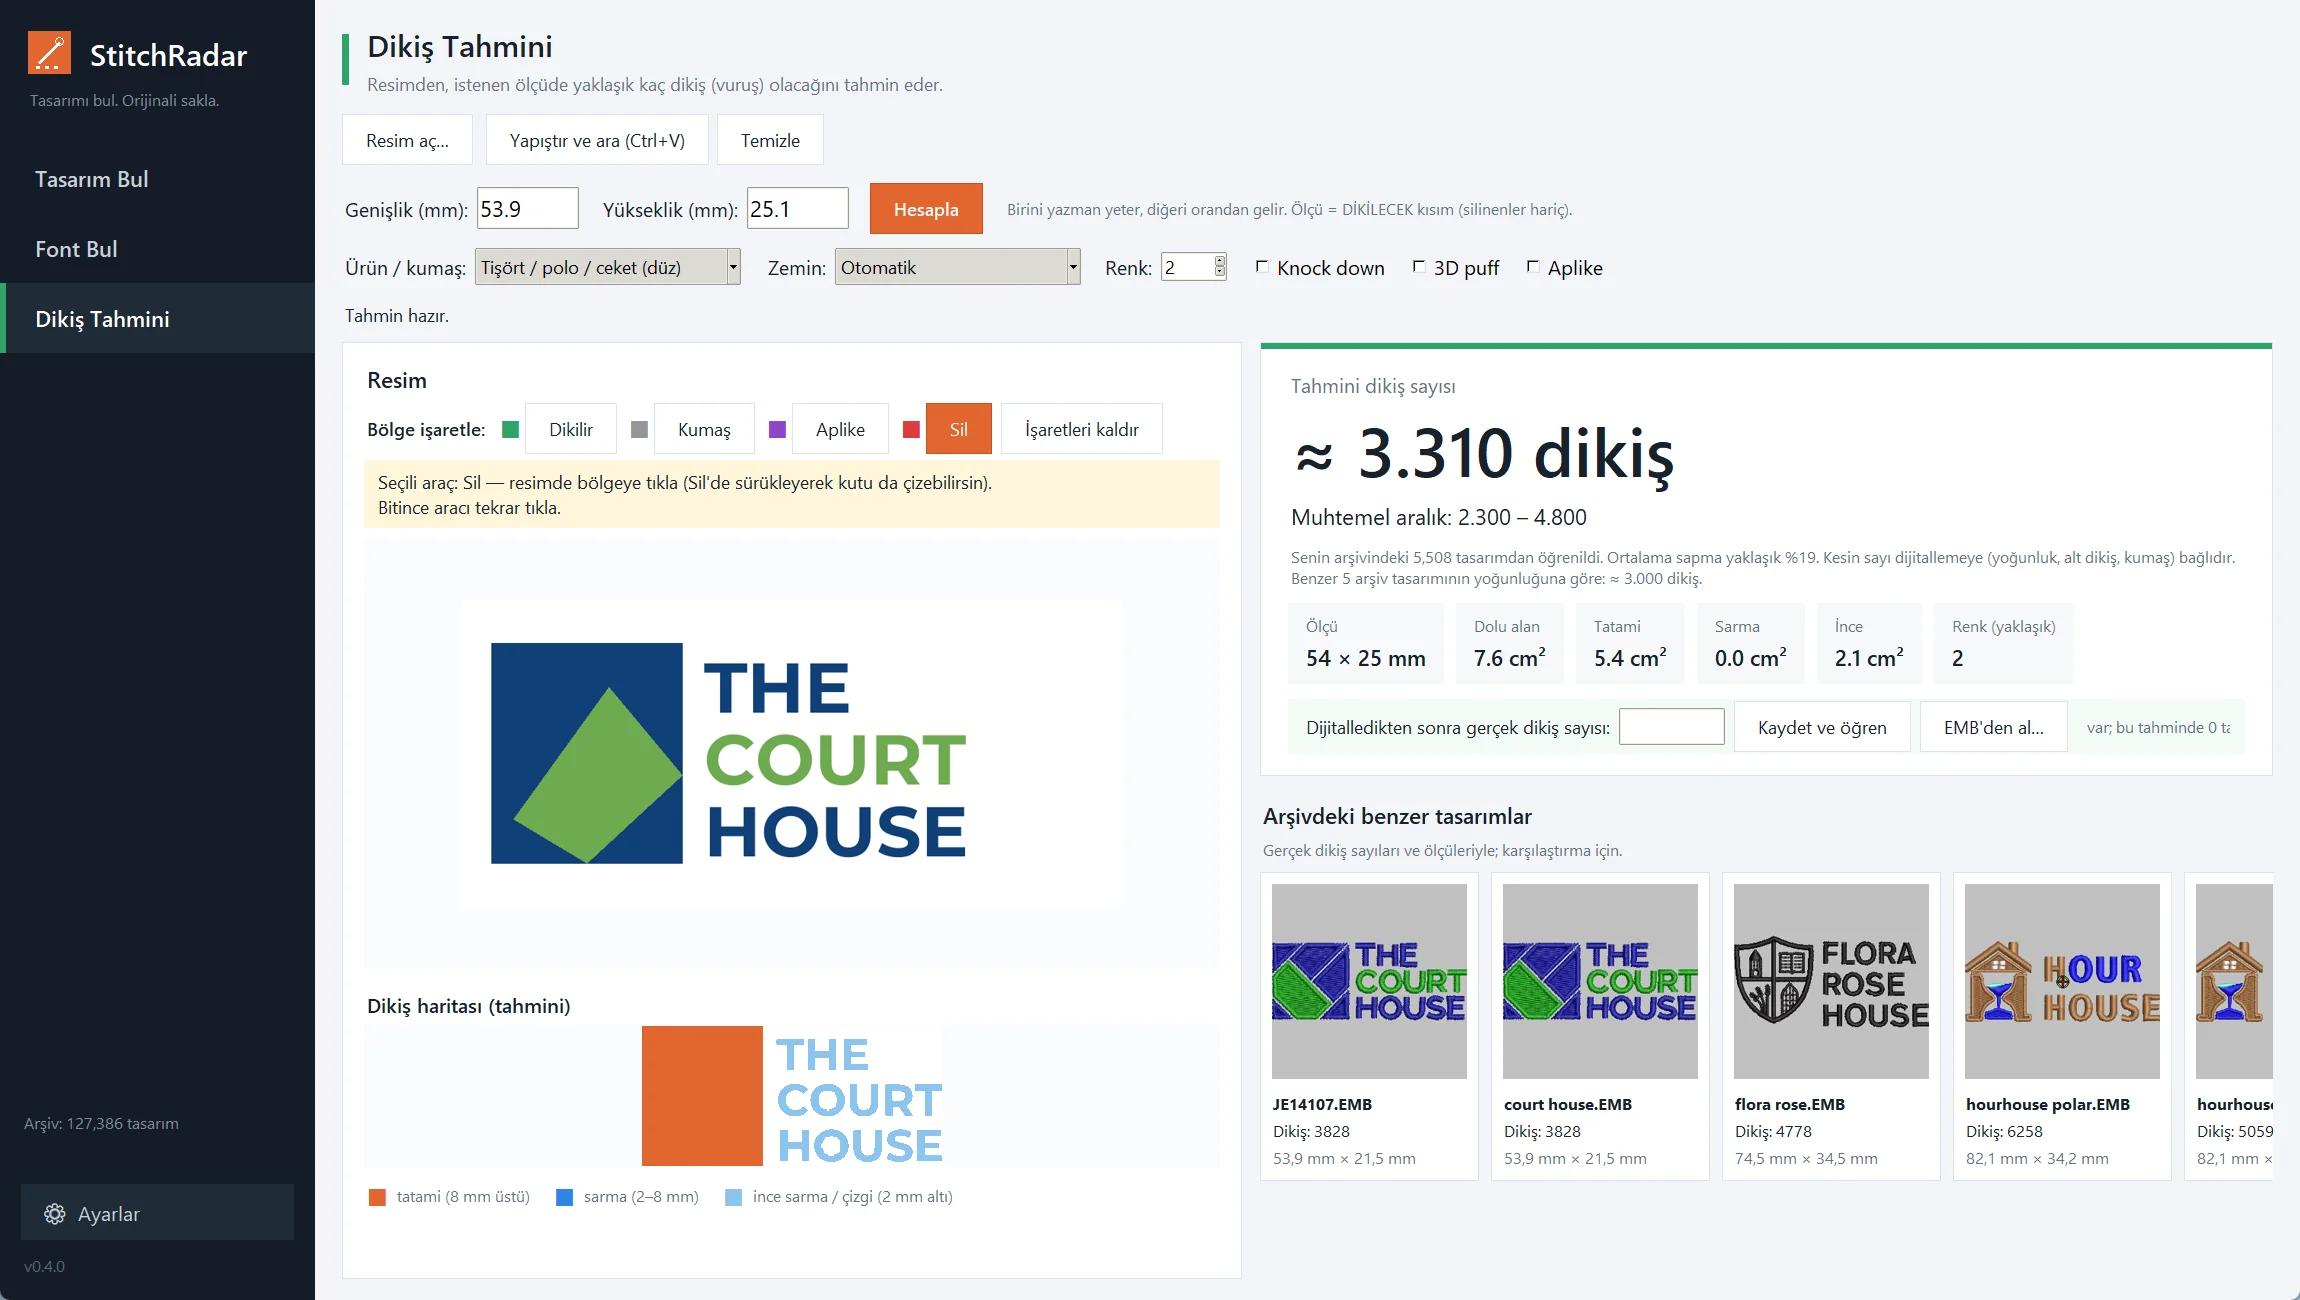
Daha doğru sonuç için resmin her parçasının ne olduğunu söyle. Bir araç seç, sonra resimde o yere tıkla:
- Dikilir — burası nakış olacak (ör. aslında dolguyla dikilecek bir zemin rengi).
- Kumaş — boş, dikilmez (ör. içinden giysi görünen kurdeleler).
- Aplike — içi kumaş, kenarı sarma (kenar ve zigzag alt dikişi hesaba girer).
- Sil — tamamen çıkar: müşterinin istemediği bir kelime, logonun yanındaki kutular gibi. Parçaya tıkla ya da dikdörtgen sürükle.
- İşaretleri kaldır hepsini temizler. Resimde sağ tık her zaman menüyü açar.
Knock down
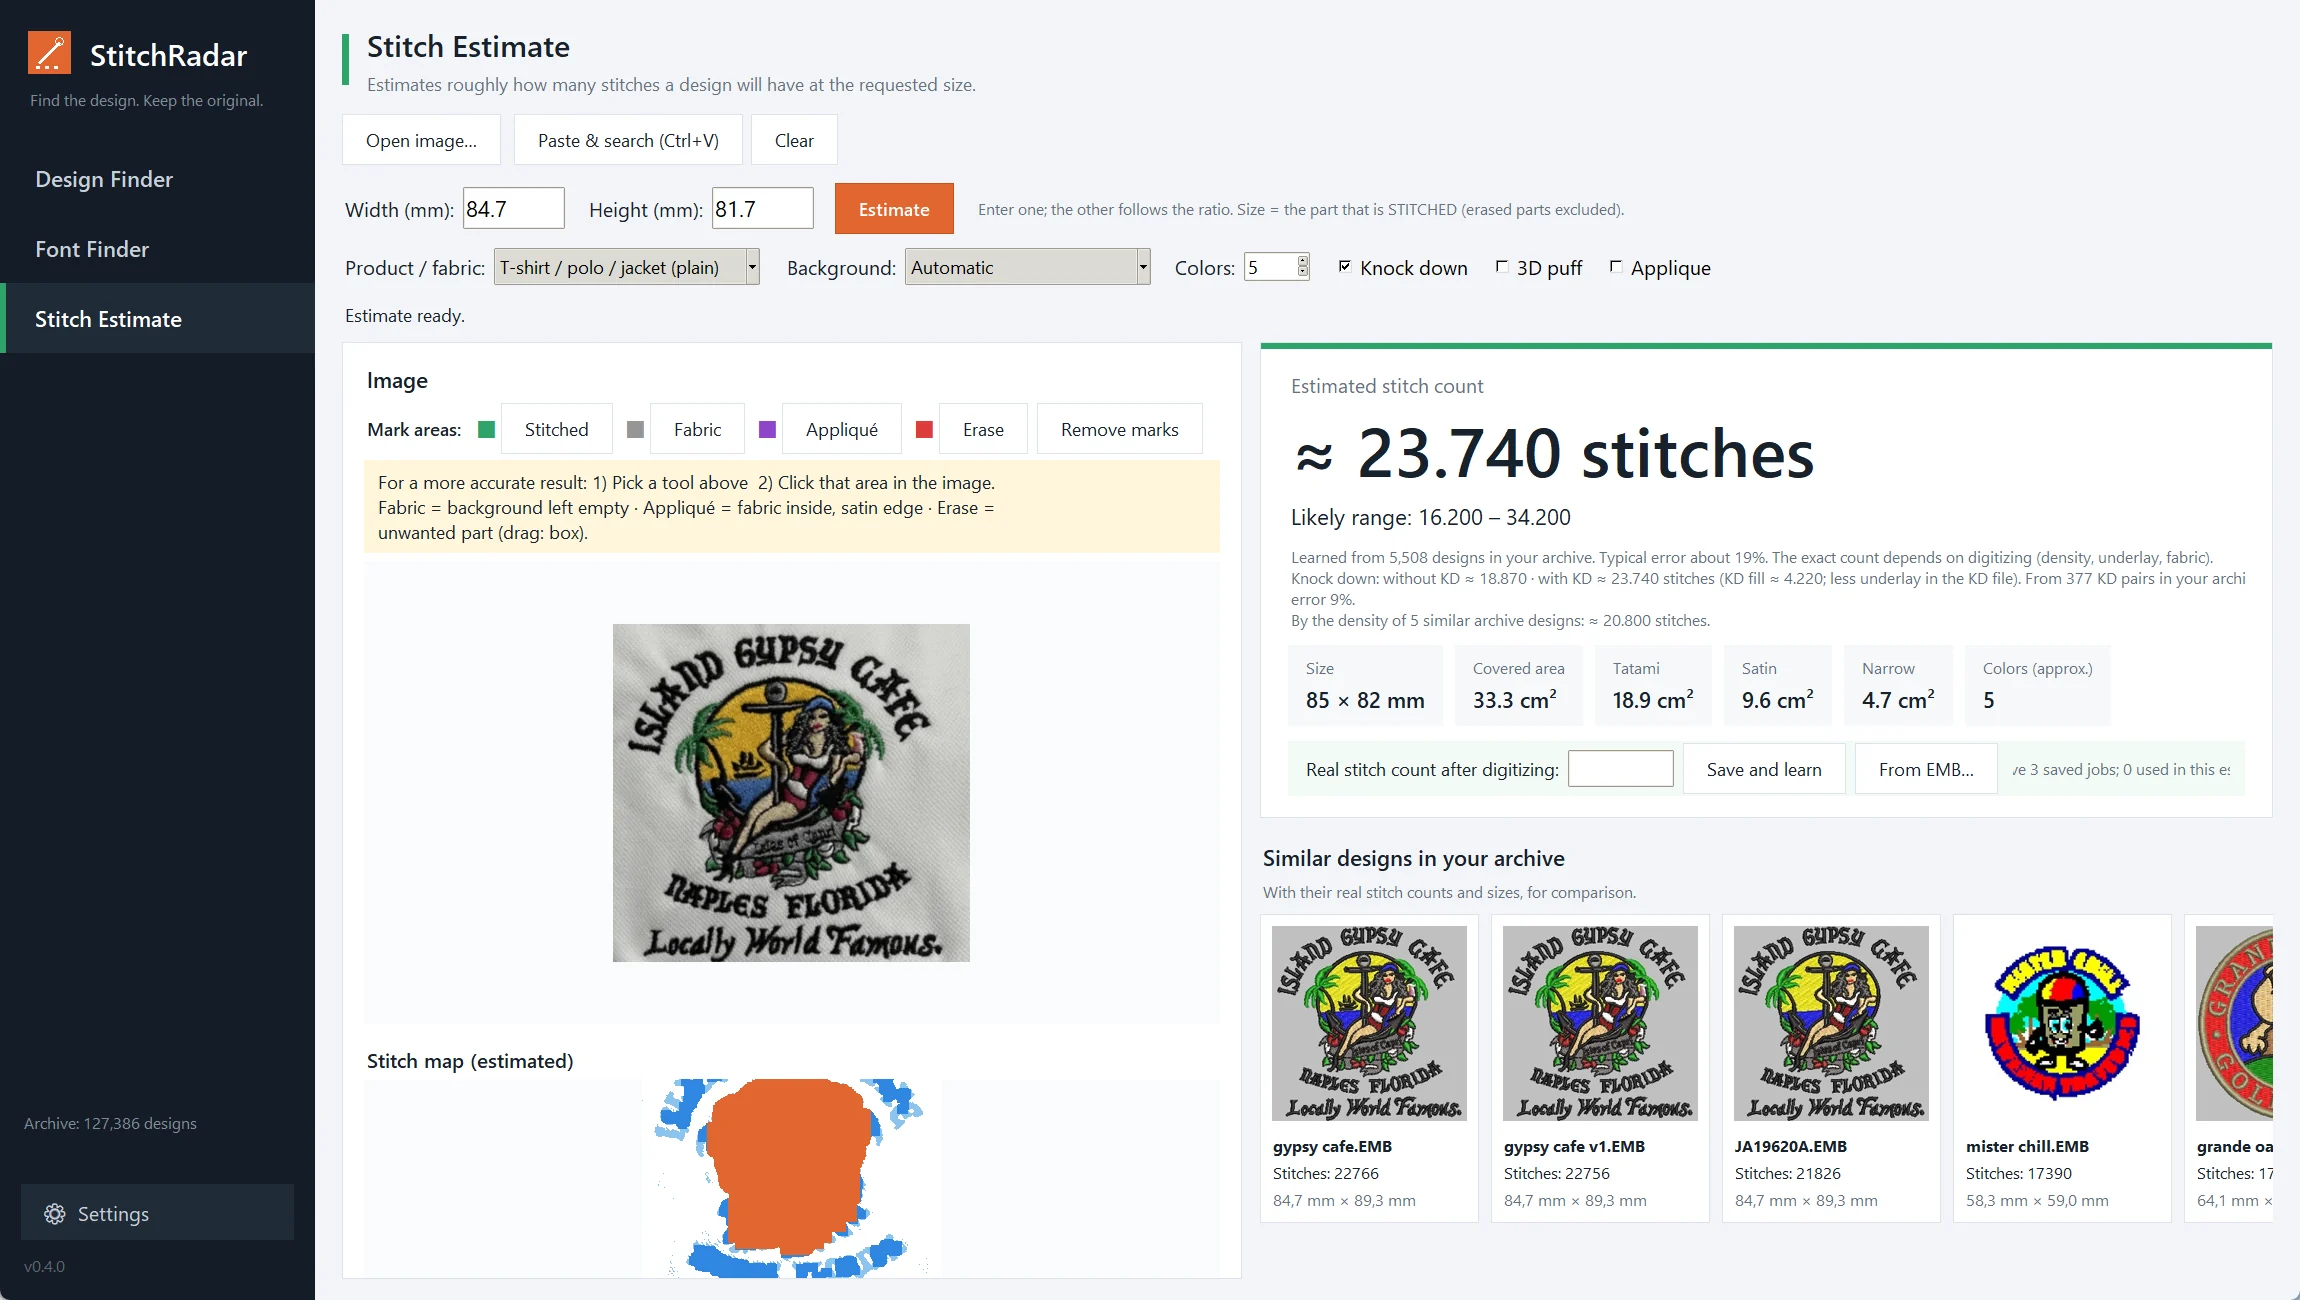
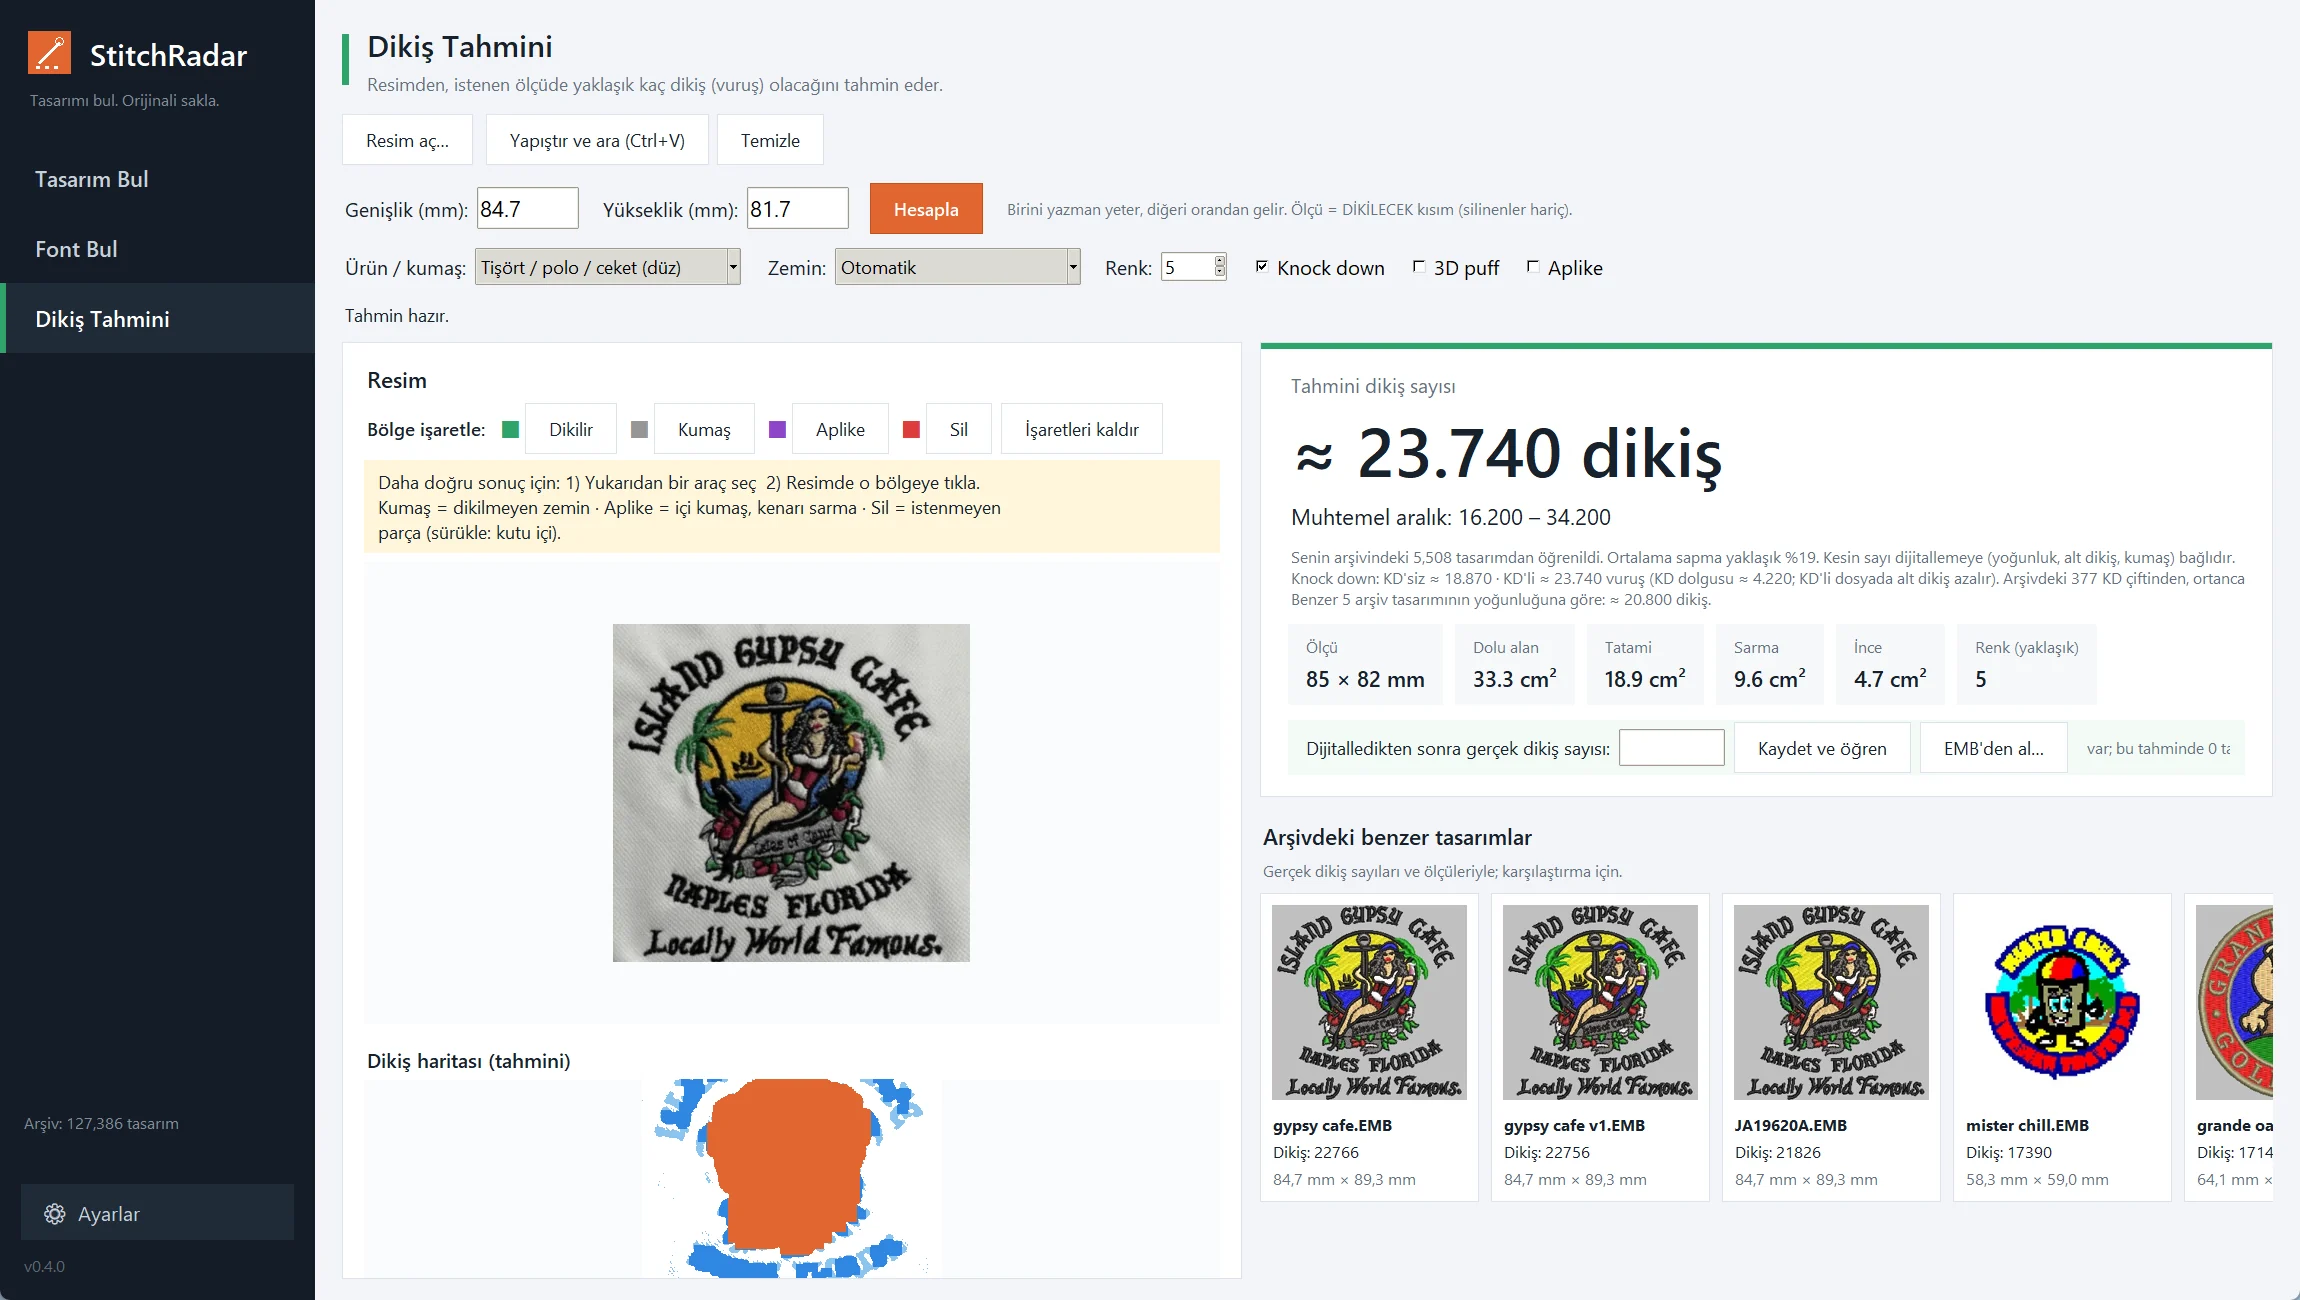
Tick Knock down and click Estimate. The note under the number shows both versions at once, because some customers want both:
Knock down: without KD ≈ 18,870 · with KD ≈ 23,740 stitches (KD fill ≈ 4,230)
The KD version adds the light fill under the lettering and drops some of the zigzag underlay and density of the main design. StitchRadar learnt this from pairs of "name knock down" / "name" files in your own archive.
Knock down'ı işaretle ve Hesapla'ya bas. Sayının altındaki notta iki sürüm birlikte görünür, çünkü bazı müşteriler ikisini de ister:
Knock down: KD'siz ≈ 18.870 · KD'li ≈ 23.740 vuruş (KD dolgusu ≈ 4.230)
KD'li sürümde yazının altına seyrek dolgu eklenir, ana desendeki zigzag alt dikiş ve sıklık biraz azalır. StitchRadar bunu senin arşivindeki "ad knock down" / "ad" dosya çiftlerinden öğrendi.
Teach it your jobs
Kendi işlerini öğret
The estimate learns from your archive, and it gets closer to your digitizing style with every job you add:
- After you finish digitizing, open the customer's picture again on the Stitch Estimate page with the same size and options.
- Type the real stitch count into Real stitch count after digitizing and click Save and learn — or click From EMB… and pick the finished file; the count is read from it.
Your own jobs count five times as much as archive designs. 5–10 jobs a week make a clear difference.
Tahmin arşivinden öğrenir ve eklediğin her işle senin dijitalleme tarzına yaklaşır:
- Dijitallemeyi bitirince müşterinin resmini Vuruş Tahmini sayfasında aynı ölçü ve seçeneklerle tekrar aç.
- Gerçek vuruşu Dijitalledikten sonra gerçek dikiş sayısı kutusuna yaz ve Kaydet ve öğren'e bas — ya da EMB'den al… ile bitmiş dosyayı seç; sayı dosyadan okunur.
Kendi işlerin arşivdeki desenlerden beş kat ağır sayılır. Haftada 5–10 iş bile belirgin fark yapar.
Updates, licence, privacy
Güncelleme, lisans, gizlilik
Updates
When a new version is out, New version — Update appears in the left menu. One click downloads (usually a few MB) and installs it; the program restarts by itself.
Licence
Your code is tied to one computer. The program checks it about once a week and keeps working offline for 14 days. New computer? Ask us to reset it. Settings → Licence info… shows the details.
Privacy
Search, fonts and estimates run on your own computer. Your design files, fonts and archive are never uploaded. Only to read lettering is the picture sent briefly to our server and on to the Claude AI reader; it is not stored. If the program ever crashes, only the program's own error location is reported — no file or customer names.
The program can't find a design I know is there
Check that its folder is in Settings → Folders… and click Build / update index. Very new files appear after the next update.
Güncelleme
Yeni sürüm çıkınca sol menüde Yeni sürüm — Güncelle görünür. Tek tıkla iner (genelde birkaç MB) ve kurulur; program kendiliğinden yeniden açılır.
Lisans
Kodun tek bilgisayara bağlıdır. Program haftada bir kontrol eder, internetsiz 14 gün çalışmaya devam eder. Bilgisayar mı değişti? Bize yaz, sıfırlayalım. Ayarlar → Lisans bilgisi… ayrıntıları gösterir.
Gizlilik
Arama, font ve tahmin senin bilgisayarında çalışır. Desen dosyaların, fontların ve arşivin hiçbir yere yüklenmez. Sadece yazı okumak için resim kısa süreliğine sunucumuza, oradan Claude yapay zekâ okuyucusuna gider; saklanmaz. Program bir gün çökerse sadece programın kendi hata konumu bildirilir — dosya ya da müşteri adı gitmez.
Arşivde olduğunu bildiğim deseni bulmuyor
Klasörünün Ayarlar → Klasörler… içinde olduğuna bak ve Arşivi güncelle'ye bas. Çok yeni dosyalar bir sonraki güncellemede görünür.